This example demonstrates how to create & configure an ASP.Net Core 3.1 MVC project with Entity Framework. I've included instructions on adding the appropriate NuGet packages, setting up the connection strings, creating a basic DBContext and a couple of Model classes, as well as using Dependency Injection to give your code access to an instance of DBContext that is shared across the whole request.
Some assumptions:
- You have Visual Studio 2019 version 16.4 or greater
- You are creating an ASP.Net Core 3.1 project with MVC
- You are using SQL Server or SQL Server Express (LocalDB). For MySQL, I've added some notes where the process will differ.
Note: If when creating the project you selected "Individual User Accounts" with "Store user accounts in-app", much of the work described below is already completed, including adding the NuGet packages, Dependency Injection, and some other stuff.
Create the Project
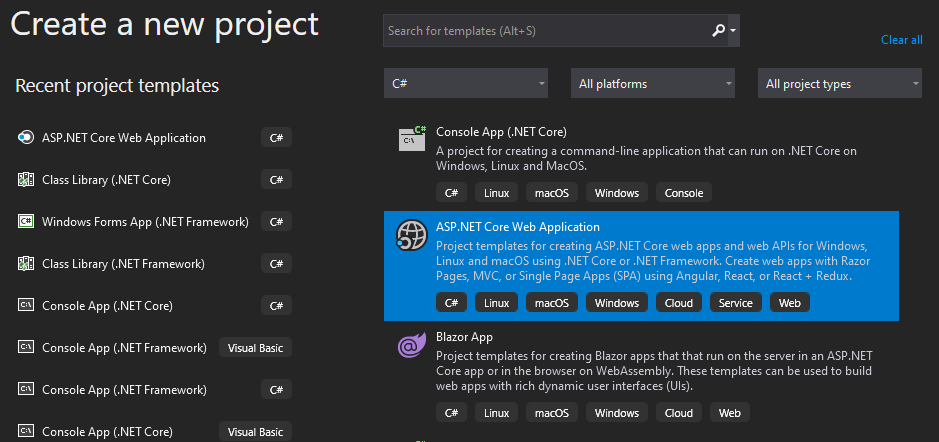
Create a new project. Select the project type "ASP.NET Core Web Application" and click Next.
Set the project name, location, solution name, etc.
- Ensure ".Net Core" and "ASP.Net Core 3.1" are selected.
- Select the project template "Web Application (Model-View-Controller).
- Set the authentication. For intranet applications use "Windows Authentication". If using "Individual Accounts" with "Store user accounts in-app", see the note at the top of this page about much of the work below being done automatically.
- Click "Create"

Install NuGet Packages
These are the NuGet packages to be installed along with a brief note about what they offer. Install them using the NuGet Package Manager (Project -> Manage NuGet Packages) or the NuGet Package Manager Console.
Microsoft.EntityFrameworkCore.SqlServer v3.1.1
- Required for basic use of EntityFramework Core with SQL Server
- If your model will be in a separate class library, install this in the model project
- If using MySQL, install this instead: Pomelo.EntityFrameworkCore.MySql v3.1.1
Microsoft.EntityFrameworkCore.Tools v3.1.1
- Required for database migrations (automatically installs Microsoft.EntityFrameworkCore.Design)
- If your model will be in a separate class library, install this in both the model and ASP.Net projects
Microsoft.AspNetCore.Diagnostics.EntityFrameworkCore v3.1.1
- Required in order to add
app.UseDatabaseErrorPage()toConfigure()in Startup.cs, which gives you additional error details when there is a database error, including very helpful information about migration issues - If your model will be in a separate class library, install this in the ASP.Net project
Create Config Files & Connection Strings
By default, two settings files are created: appsettings.json and appsettings.Development.json. (Expand appsettings.json to see appsettings.Development.json.) If you're not familiar with how the framework uses values from each settings file, you'll want to google that. But the basic idea is that appsettings.json is used in a all environments (including Production) and appsettings.Development.json is used only in a development environment. While you could add your production connection string to appsettings.json, I recommend making things extra clear by adding a third settings file appsettings.Production.json to contain the production connection string.
Add a settings file for Production:
- Right-click on the project
- Click Add -> New Item -> App Settings File
- Change the name to `appsettings.Production.json'
- Click Add
The new Production settings file contains a sample connection string. Update it now or later with your production connection string.
Add Development Connection String:
Add a development connection string to appsettings.Development.json:
{
  "ConnectionStrings": {
    // DEVELOPMENT connection string
    "DefaultConnection": "Server=(localdb)\\mssqllocaldb;Database=aspnet-some-project-name;Trusted_Connection=True;MultipleActiveResultSets=true"
  },
  "Logging": {
    "LogLevel": {
      "Default": "Information",
      "Microsoft": "Warning",
      "Microsoft.Hosting.Lifetime": "Information"
    }
  }
}
Create Model Context and Model Classes
Create your model classes (here's a simple example):
public class Widget {
    [Key]
    public int Id { get; set; }
    public String Name { get; set; }
}
Create the DBContext class:
public class ModelContext : DbContext {

    public ModelContext(DbContextOptions<ModelContext> options) : base(options) {
    }

    public DbSet<Widget> Widget { get; set; } // Singular is standard (not Widgets)
    public DbSet<Kitten> Kitten { get; set; }

}
Configure Startup.cs for Dependency Injection & Database Error Page
Set up Dependency Injection (what is that?) by adding services.AddDbContext() with options.UseSqlServer() to the ConfigureServices() method in Startup.cs:
public void ConfigureServices(IServiceCollection services) {
  services.AddDbContext<ModelContext>(options =>
    options.UseSqlServer(Configuration.GetConnectionString("DefaultConnection")));
  services.AddControllersWithViews();
}
Note: If you are using MySQL, you would use options.UseMySQL() instead of options.UseSqlServer().
Enable a detailed database error page that gives you additional error details when there is a database error, including very helpful information about migration issues. When the model has changed without a migration, it tells you what to do. And if migrations exist that haven't been applied to the database, it even gives you an "Apply Migrations" button (development environments only). It's much better than just dumping out the original error.
public void Configure(IApplicationBuilder app, IWebHostEnvironment env) {
    if (env.IsDevelopment()) {
        app.UseDeveloperExceptionPage();
        app.UseDatabaseErrorPage(); // <-- Add this line
    }
Reference DBContext In Controllers
Make DBContext accessible from within each controller by adding it to the controller class and setting it through the constructor:
private readonly ModelContext _context; // Add this line
public HomeController(ILogger<HomeController> logger, ModelContext context) { // Update this
  _logger = logger;
  _context = context; // Add this line
}
// Access _context in any method in this controller
Note: You can automatically generate most of the code required for a working controller by right-clicking the Controllers directory, clicking
Add -> Controller, and selectingMVC Controller with views, using Entity Framework. The model injection shown above will automatically be included.
I'm personally not a fan of using the _ prefix for private fields, but that is the C# standard Microsoft is using in their templates for .Net Core 3, so I'm using it too.
Install Entity Framework Core Tools for .Net CLI
Entity Framework Migrations are a whole subject of their own. However, before you can do them at all you'll need to install the DotNet EF package.
To install the Entity Framework Core Tools for .Net Command-Line Interface (CLI), open the Developer Command Prompt (Tools -> Command Line -> Developer Command Prompt) and enter the following command:
dotnet tool install --global dotnet-ef --version 3.1.1
This installs the dotnet ef tool on your system. It may already be installed if you have done this for another project.
This tool can apparently be installed using the NuGet Package Manager, but there seem to be a bug with the latest version (gives compatibility errors) and every resource I've found online points to installing on the command line.
Next Steps
The next steps usually involve creating your model, saving changes as Migrations, and applying them to your database(s). See my guide on migrations here: Migrations in Entity Framework Core 3.1
Conclusion
At this point you should have an ASP.Net Core 3.1 MVC project with Entity Framework, the correct NuGet packages installed, a DB Context that can be referenced throughout the project using Dependency Injection, a couple of connection strings, and a more detailed database error page.